Tuesday, October 6, 2015

It's No Use! Take This!

Hey guys! 
FIEA is moving forward rapidly and it seems that I'm not keeping up quite to the speed that I would like. For shame! It's seems that I will not be blasting through some of these assignments with Sonic Speed. 
Lame pun is lame. I know.

But do not fret, dears, for I have at least one awesome assignment that I completed before the deadline this week. That would be the tile texturing for our weekly Common Core class! *throws confetti* 

Now this assignment was fun. Got to play around in ZBrush and figure out exactly what kind of tile I wanted to make. Now, the only draw back I had was that ZBrush kept on doing this strange thing of disconnecting to the modeling I was carving into and making it into a canvas. I'm not sure what causes this, however I'm eager to find out what does. Perhaps if I can do that, I can prevent it from happening ever again. I would hate to constantly redo the same assignment 3-4 times so it can work (which is what happened with this assignment). 

"Why me..."

However! With some patience I was able to make something awesome for all to see. 

First off though, let's looks at the renders taken right out of ZBrush!

The Main Render. This is the overall design for a soon to be colored tile. Looks pretty cool as it stands now. It's not painted. I like to sculpt on the red material instead of the grey. Not sure why. I think the color just pops more for me. 

The Depth Map. Shows, well, the depth of the scene. As good as that is, I think it may have ended up drowned out from the final piece. 
The Normal Map. Looks neat like this as well. Honestly, I'm surprised that it looks so neat and clean. 

Now for the coup de gras!
The Final Color Render. Final look of said assignment. I think I captured the heat and look of lava quite well. A first for me, actually. Always had trouble setting up the correct color pallet and design for lava. Who knew that doing the main concept in ZBrush would be the best course of action. 
As a whole, there wasn't too many problems I encountered. I already expected there to be seams to fix when I imported these lovely files into Photoshop. It is rare, from what I've seen, to not have to fix seams for a tile texture.
Of course, that wasn't a problem to fix. Perhaps the only annoying problem was what was mentioned earlier in the post: ZBrush doing strange things and making me revert to a previous file. But then, that's what happens with technology. Things will eventually act strange, delete files, corrupt files, crash or just make things a pain to fix. Though all we have to do as artists is to make do with those issues and posh forward to make awesome digital pieces. 
See yeah next time~!

Monday, September 28, 2015

Be Prepared

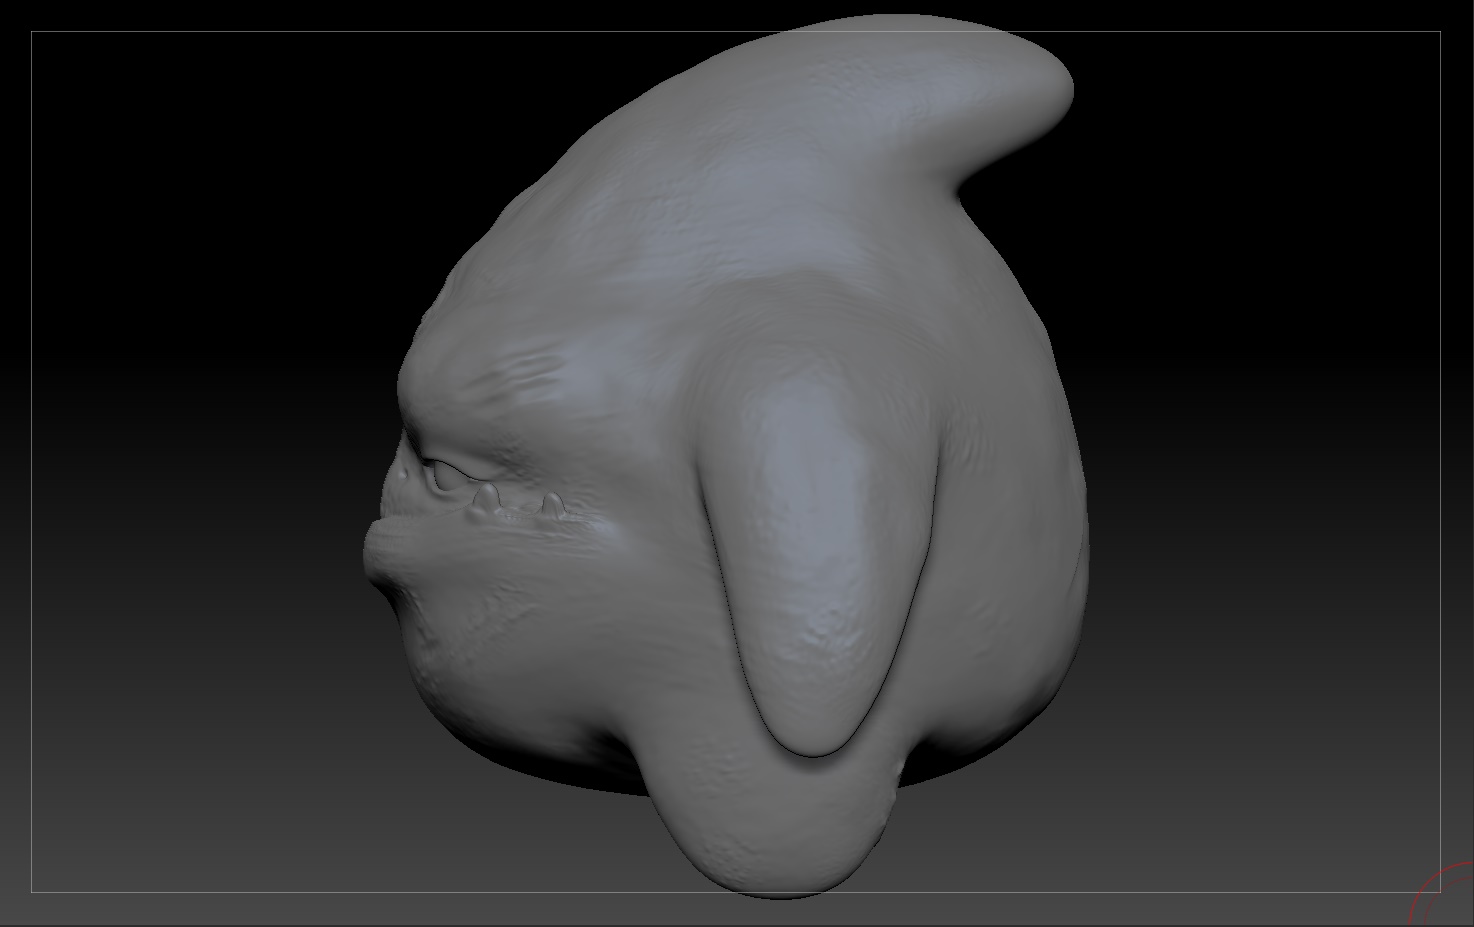
For a scarred up bipedal starfish!

Hey, looks like another assignment done. Or at least sculpting part is.

This guy here has no official name, though, like the one that was modeled, I shall call him Bruce.

Bruce here is a decent aged creature that works along side a fish-like creature on the battlefield
.
I think he's working a little too much around those canons, don't you think?


Look at those scares on his face. Those burns (or at least it'll look more like burns once it's colored). 


He looks pretty neat, right? 

But this isn't his final design. Though not too different from this one, it gives the guy a bit more of a kick. 


Now looking at it away from the program, it kinda seems like I should put something more towards his backside. It kinda looks a bit bland. But then, I shouldn't go overboard. He is a fleshy character after all. 

Either way, I think he looks pretty good. I think, maybe, his teeth are my favorite part. I don't know, came out different than the concept art, but looks so good. xDD


Anyone else get the feeling this starfish is a little young? It must be those tiny teeth, he's probably adolescent at this stage.

Under the Sea with 3D Models!

Darling it's better! Down where it's wetter!

I'm back and posting some new material! And no, it has nothing to do with the Little Mermaid. Instead, it's with one of her extremely deep sea friends. 

In 2D/3D art, we were assigned to model, sculpt, texture and set one style of fish into the Unreal Engine. This was to be done in about a weeks time, which is a lot of if you think about it. 

For my choice, I decided to go with a "bass" looking fish.

Low poly all around! I was actually pretty surprised I was able to do this relatively quickly. Only took me longer to get the Normal Maps to look clean. Which is cool, since I thought sculpting in ZBrush would have taken longer. 

Especially with how it came out. 

It has so much detail! I think I like the sculpting aspect a lot more than the modeling. Who would have thought? 

Though that's not all! Next was color mapping, and I think I had a bit too much fun with that one. 


I'm going for a fish that emits Bioluminescence in the deep ocean in order to attract either food or mates. Though usually they have blue, I enjoyed the idea of having one emit a pink-ish glow instead. That really came out when I placed it into the Unreal Engine. 


I think the fish is a little big for a deep sea critter, though it looks really neat! I just love that light glow it has, and how there is a tint of blue light in the engine. I'm really hoping I got that good feel of the deep. Which is the first time of attempting it in any engine. 


If anyone's curious, this is what I did for my fish to look alright in the engine. It looks great when I first put it in, it's even better now. xD

Monday, September 21, 2015

Maybe we'll turn it all around

'Cause it's not too late
It's never too late!
Well, looks like things in the digital world has not gone as smoothly as I would have hoped. One would think homework would be such a simple task. Sit down, do some artsy things, and then submit it once it's done.
Of course, it's never that easy.

It's been some time since I've updated. Since then, I have found that quite a few programs, specifically those created by Autodesk, do not like me.
I've had:

  • crashes
  • lag
  • saving errors
  • computer issues
  • blue screen of death 

I'm not sure what is going on here, though all of this started happening after the day of power surges throughout the campus. I thought everything was fine, but both today and yesterday evening, my computer has failed to run heavier hitting programs without freezing or switching straight to blue screen.

Heck, even my desktop wallpaper doesn't always show and it's just one image.

I wish I could figure out this problem on my own and get back to work. But instead, I'm blogging about my pain and suffering. Not exactly at that point, but I am indeed frustrated to the point of wanting to bash some heads in Gears of War. Or maybe I'm just seeing red....lots of red.


Eh, well. As much as I would like to complain even further, I could say that at least I was able to finish some aspects of my homework. Though I really dislike that it isn't as much as I would like to have finished. 

For 2D/3D Art, I was able to finish Bake Mapping and setting my High Resolution ZBrush model Bake to my super low res game model while still looking good. Which I'm ecstatic about. Though, unfortunately I cannot get freaking Mudbox to work. I'm quite positive that if my programs aren't working properly and I'm constantly seeing that blue screen error, they are connected at one point. I probably have something wrong with the processing on this laptop or something. 

 Anyway, here is my model in Autodesk Maya 2016 with the normal map added. 
While this one is from Mudbox 2016 just before it crashed. Literally just placed the model into mudbox, saved and it crashed. Go...me...
Hopefully I can get this squared away soon. Fingers crossed for me guys~


Wednesday, September 16, 2015

Core Art - Let's Model

Low Poly Style!

This little guy here is referred to as Bruce to me, Carl for others, and Kevin to the rest. Don't ask, I don't know.

In all truth, he has no name, so I guess I will continue to call him Bruce until his true name emerges. Anyway, this guy here is a companion "monster" to another monster, as funny as that sounds. Moving from quick concept art to now modeling, we get a taste and practice of more 3D modeling, which has been the most fun I have had in Maya lately.

With all of the technical errors, crashes, and Maya not doing exactly as it is supposed to, sitting back and just building a model last minute was somehow relaxing.


He's pretty smooth on Smooth Mode, which is awesome. 
To be honest, I'm quite surprised it came out this well. He should look even better in color. <3

Animation - Graph Editor and the Bouncing Ball

To bounce or not to bounce...
                                                                  That is not the question


Animation is totally kicking up with another assignment, this one I regrettably had to rush through the night before it was due. Part of the problem was caused that for some odd reason, none of the balls wanted to animate in a new scene. So, I had to go to a previously saved version for an earlier assignment and save that as a new scene and work from there. I'm still not entirely sure what is the deal with Maya, but I will be working with it all day today so I will figure it out eventually.

Anyway, this is my speed run through of animating a bouncing ball. This time there's three different weighted balls: standard rubber ball, bowling ball and a ping pong ball.


Looking at it after turning it in, I can see that I screwed up the animation when I planned out the weights. I know how each of these types of balls move, however it seems that I still haven't perfected how to properly animate them as of it.

It seems that I still need more practice.

Hopefully I do better with organic when the time comes.

Tuesday, September 15, 2015

RPP - Round 1


I Challenge You to a Battle of...
                                                                  KITES!


Hey guys! FIEA is moving forward and classes are rapidly becoming filled with loads of work, concepts and, of course, video games. First up this week is the first round of Rapid Prototype Production game made in Adobe Flash. 

Assigned into an amazing team, the five of us had to work hard to make a clean and playable flash game in just two weeks. Probably doesn't sound too difficult, but on top of other assignments as well as work and real life, this can become rather challenging. But of course, challenge accepted
In just two weeks, we made an amazing and fun game known as: KITE FITE.

As you can see, this particular game is made for two players. 
                       Object of the game: Defeat your opponent.  
It's a very simple objective, and made to be childish fun for all to enjoy. Though, you can also be as competitive as you would like. Personally, I like to just have some fun and mess with the controls as I fly my Ram Kite. 

As for the weapons, they are simple toys (yo-yo, fan, and top) that serve as three different types of combat styles. Each having an unique feel and style which can serve the player's strategy to defeat their opponent. 

The focal point of the game are the kites. Tied down by their "weapons" the player chooses one of eight kite designs. Each color coded to their respective Chinese Zodiac sign. 

 In this game, you are able to choose from these eight zodiacs: (from left to right) Dog, Dragon, Ox, Pig, Ram, Rat, Rooster, and Tiger.  


This amazing game's clean and stunning artwork was accomplished by both myself and Summan. We wanted to play off of ancient China and their love for kites. Not too many people know that they were the ones who created Kites, so we wanted to pay homage to such an amazing discovery.

The game would never have reached to such amazing playability without our two highly skilled programmers: Nihav Jain and Brian Bennett. They made all of the game play possible and they are awesome for their incredible skills and input into the game. 

Our final member provided so much input, kept us all working together and was essentially the Creative Lead for the entire project: Agnesa Belegu. She's amazing and any group would love to work with her. She has such great ideas, and so does the rest of the group. Will miss working with all of you guys as we move to our next RPP section.