
Monday, August 8, 2016
Monday, August 1, 2016


Monday, July 18, 2016
The Sculpt is here!
Hey guys,
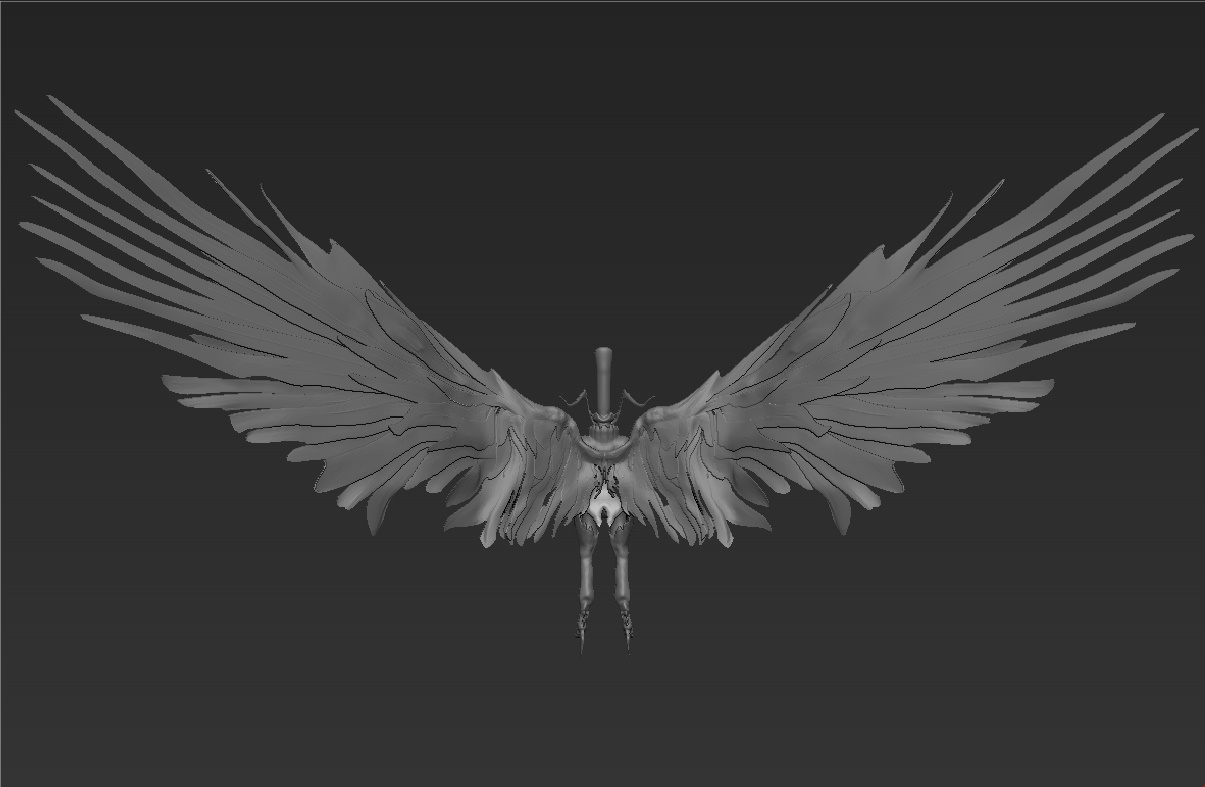
The sculpt of the Persona Arsene is finally complete and now I get to move onto converting this into a gameres mesh.
Now, for me the worst part of the sculpt is the wings. Which is actually perfectly fine, since I plan on doing all of the wings as cards. No normal map, and just painted to match the actual style of the Persona 5 game that will be released in NA next year. Those wings were essentially made to have a premise of the overall size I need, as well as some of the feather fanning silhouette he would have.
Other than that, I believe everything else is in order. All his pieces are ready for Maya, and it should come out nicely in the end. Woo~


Monday, June 27, 2016
I am thou...thou art I
For the justice you believe in, let the curse befall on those who do not reflect upon themselves.
Hey guys!
It's time to show off what I will be working on for our next assignment in 2D3D! This one is going to be a challenge, but one I'm really eager to try.
This guy here bellow is Arsene, a Persona for the main protagonist in the soon to be released game in Persona 5.


This is going to be a fun assignment. I can already see that the two most challenging part would be the wings and the cloth on his neck. But other than that, it is something that I think I can manage. It would be nice to be able to play with yet another stylized piece, humanoid, and still a creature.
Am I so beautiful...
...That you've no words left?
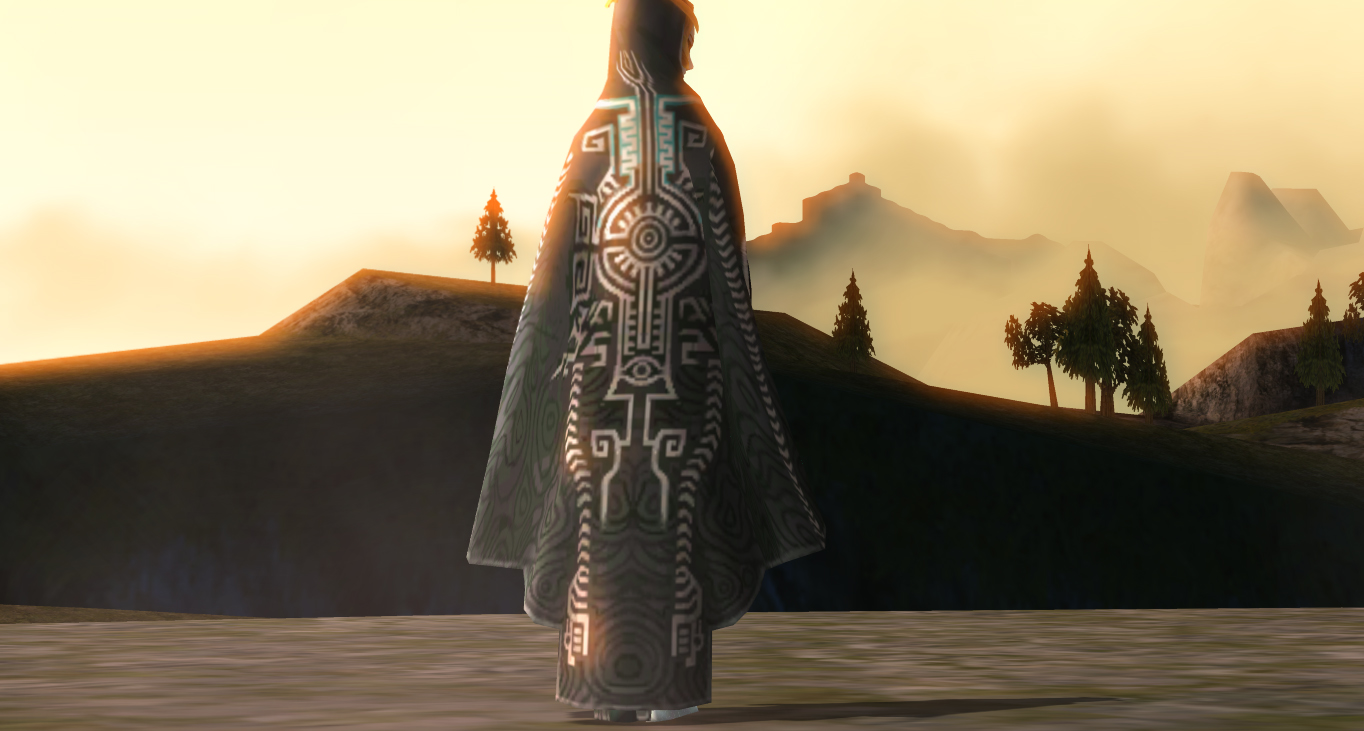
The time is finally here! Midna and all of her beautiful glory!
Now I have had a lot of fun and headaches with this assignment. Not only was this my first human model, but also first time making cloth and quite complex designs on the maps as well. Regardless, this was a great test and practice for me. I wanted to learn how to make a human model, the entire process, and I think it came out great!
 |
KeyShot Render w/Photoshop Modifications |
With the Keyshot render, there was some odd things that happened when I rendered the model with Ryo. The textures for the mirror refused to show up, so for this version, we decided to make it come out like a stand instead. It's rather unfortunate that the mirror did not read at all. Would have made a cool look bellow her feet had it done so.
 |
| UE4 In Game Screen Shot |


And here are some screen capture, and video, of the Unreal Engine version of my model. I'm hoping to get the model up on Sketchfab too so it can link to my ArtStation account. Let's hope that comes out well. Fingers Crossed.
Until next time.
Monday, June 13, 2016


Wednesday, June 1, 2016
Light and Shadow cannot mix..
Never forget that there's another world bound to this one.
Hey guys! Time for another update, and one way past over due.
In case it was forgotten, I am trying to recreate True Form Midna from Twilight Princess into a beautiful 3D Sculpt, along with Gameres Mesh and a marvelous pose. Now, what is completed at this stage is the sculpt. Something that took far longer than I previously anticipated (was far harder than I had imagined doing all of her pieces and just getting her face just right.
Anyway! For your viewing pleasure, below is one of many reference photos that I am using to create this awesome heroine.

And now, take a gander of my version of her beauty~! Though, I did make some alterations to her design. Very small alterations. It's more about the positioning of things and some of the details were "changed" to the extent of bringing them forward more than the textures that were shown in the original game model.
Now, on to the gallery of pictures!


Until next time!
Wednesday, May 18, 2016
If all of Hyrule are like you...
....then maybe you'll do all right
Hey! It's a new semester and now I get to work on 3D portfolio pieces. Woo!
(Well, next to Capstone Game and a Cinematic piece. But details!).
I have to work on two different pieces and I have 6 weeks to sculpt, model, texture and "bring to life" what is chosen for those pieces.
This time around, I'm moving away from the animal aspect, as much as I love to sculpt and model critters, to expand my character repertoire.
This time, I shall work on one of my favorite characters of the Zelda Universes. And no, it isn't Link nor Epona. Rather, I'm planning on bringing the character Midna to life. More specifically her True Form.


She has such an awesome design, and one of the biggest things I get to practice with would be the fact that she's human. I don't often work on creating humans. But, it would be good to practice, and I can't pass up the opportunity to work on a Zelda Character. Could have done Ganondorph, but doing a female would probably be a good idea.
Anyway, this is what I'm shooting for for this project. Optimized final look would be from Hyrule Warriors (top photo), as this is their current format for "high definition" LoZ game.
Sunday, May 1, 2016
Attention Monsters!
He has finally ARRIVED!
The time has come for me to pay up and show off the final piece. The master piece. The coup de gras. You get the idea.
In case it was forgotten, I worked on a deer-like creature for my assignment named Aiju from the game called Gyromancer. It was developed by both Square Enix and PopCap Games in 2009. Never played it myself, though I really enjoyed the artwork so I chose this guy because he just called out to me.
There was a lot of things learned from this experience, one is that doing planes for hair is REALLY difficult and I would need to find another process to do them than what I did for this guy. Maybe I can get a Tech Artist to make me a short cut. lulz
First up, final render in Game Engine. He came out pretty nicely, spent hours getting those planes to look good, and now they are pretty nice. Still not sure how to properly get that realistic look Square does with Final Fantasy, but I think this is a good step towards the right direction.
What's interesting is that the render in Maya is much darker than the final render in Unreal. It's the usual in that case, but I always find it funny.
The time has come for me to pay up and show off the final piece. The master piece. The coup de gras. You get the idea.
In case it was forgotten, I worked on a deer-like creature for my assignment named Aiju from the game called Gyromancer. It was developed by both Square Enix and PopCap Games in 2009. Never played it myself, though I really enjoyed the artwork so I chose this guy because he just called out to me.
There was a lot of things learned from this experience, one is that doing planes for hair is REALLY difficult and I would need to find another process to do them than what I did for this guy. Maybe I can get a Tech Artist to make me a short cut. lulz
First up, final render in Game Engine. He came out pretty nicely, spent hours getting those planes to look good, and now they are pretty nice. Still not sure how to properly get that realistic look Square does with Final Fantasy, but I think this is a good step towards the right direction.
 |
| He made it into engine, and he looks fabulous~ |
 |
| 3 quarters view, just to see that awesome tail of his |
What's interesting is that the render in Maya is much darker than the final render in Unreal. It's the usual in that case, but I always find it funny.
Front and Side views of the final render from maya.
 |
| Maya Render, and his mane looks much more fiery in comparison to Unreal |
And in case you were curious, here's his mesh. Final poly count was a good 20,246 polys. Just 246 over what I wanted to cap myself at. Nothing too worry about. Probably could have thought of something a bit more creative for the plane placement of the head, but I'll think on how to do that another time.
 His mesh is pretty clean, if you ignore the mess that is the planes
Unfortunately, due to time, Aiju couldn't be posed. But he looks fabulous anyway, right?
|
Sunday, April 17, 2016
Yeehaw!
Run like the wind, bulls-eye!
It's that time again~! Time for another update!
Remember this guy?

He is my project for a good month or so, and my job is to make 3D work, from sculpt to game res mesh to engine. Now, this past two weeks was spent both trying to figure out the shapes being used for this guy and getting a nice and clean sculpt out of him.
First step, what are his actual shapes?

That was pretty straight forward, and made it pretty easy to go onto the next step. That was the both model his basic shape, and then get him into ZBrush. Or at least, that's what made it really easy for me to do.
Proxy Maya Model:


Zbrush Sculpt:


And finally, a fancy turntable just to show off all of the angles. 83
Wednesday, April 6, 2016
Month Long Project a-go-go!
So much art, so wow~
Alrighty, let's have another update! Yay!
I'm going to work on this guy here, making him in a 3D model in Autodesk Maya, then moving him into ZBrush. This will be a fun project and a relaxation from working on the same creatures for a while now. Would love to mess with that fur when the time comes. xD


Alrighty, let's have another update! Yay!
For my specialization class, we are going to start working on Portfolio pieces. We get to choose what we want to work on, and as someone who LOVES working on monsters and animals, guess what I chose?
 |
| Aiju from Square Enix's Gyromancer Game |
 |
| Aiju shape language study |


My sketch, side pose for game res modeling. And sculpting rederence.
Subscribe to:
Posts (Atom)