This one is rather straight forward. On Photoshop I compiled scans of all of the homework we had this semester for Drawing Fundamentals. Yes, majority of these are traditional. Something I haven't done in a while.
Most of these was done on Toned Tan paper with Faber Castle Watercolor Pencil. Line work is done with Copic Multiliner pens (sizes 02, 05 and 08) and a white gel pen.
Digital files was done in Photoshop, of course.
I can see that I have improved a lot over this semester. Hopefully my speed will improve as well.
Hey guys!
A little late in the game updating now that the semester is coming to a close. Though that's alright! I still have some nice things to show off. One such item is the most recent RPP! Now this one was fun, though also something that has caused every team a bit more of stress.
Why was that?
Well these games were prototypes for Capstone Pitches. Out of 25 previous pitches, only 11 made it through to the prototyping phase and among those was The Scales of Truth. This game was something that I felt would make an awesome game, given the chance. Of course, it did not make it to the final phase of Capstone it was still fun to make.
Now, what is The Scales of Truth? Well, it is a Action Adventure Platforming game where you play as a 16 year old Anubis - the God of Funerals, Embalming and the Dead. He recently obtained the responsibility of Judging the Souls of the Departed as well as Protecting the magical Scales of Truth. This item is used to judge a person's soul in a room of 40 or so gods to see the fate of the soul within the Afterlife. Of course, such an item isn't needed as the young god is capable of doing the judgement himself.
Though, all of this would probably be easier explained within the game demo below.
The overall concept of this game is to play as this young god, solve platforming puzzles (which would be much more advanced than the prototype we created in the 2 week time). Essentially, inspiration for such a game play was Assassin's Creed Side Quests where Ezio traversed through ancient temples.
What was probably the unique feature to this game was the Judgement Mechanic. This game was being planned to have three story routes, that are linked to the "morality" of the character. Good, Neutral and Bad routes are linked to the actions of the player. The player would be running into souls that have lost their way in the current chaos in the underworld. Because it is Anubis' duty to lead souls to their proper path, he must locate them and, unfortunately, judge them on the spot after figuring out whether said soul should reach the Valley of Reeds or in Ammit's Stomach. The choices are based off of clues found within the dungeon, or whether or not the player wishes to take a specific route.
In order to get the good path, the player must make the "right choice." Said choice is often to place the soul in their form of Heaven (Valley of Reeds), though they will have to send the really bad ones to their horrible fate. Going through this route, the player will obtain allies that will provide them with items, weapons, as well as assistance - whether that is within the dungeon or during battle.
The bad path is if either the player sends all souls to "Hell" or ignore the souls he should be judging (would be either by communicating to the soul and just leaving, or simply automatically judging them on the spot). This prevents the character to obtain/keep allies and will make the game much harder. However, the player will obtain much more magical abilities, usually the more destructive. In this path, it is a higher probability of Anubis joining the villain who had stole the scales.
The neutral path is self explanatory. It is a mixture of both, which leads to a different ending.
This Judgement Mechanic also leads to a different format of "customizing" Anubis and the availability of weapon upgrades.
Essentially, this game was a coming of age story where the player gets to choose the path Anubis takes and what kind of God he will become.
But of course, said game did not make it through the selection process. Some awesome games did, however. Leylines, Child No More, Photography Guru, Sketch Artist, and The Channeler. Though not the same visual theme, Leylines has some awesome game mechanics that should be very fun to work on. This, and so many monsters to design! Yay.
In the future, however, I would like to revisit The Scales of Truth, and see if I can make it much more concrete and perhaps create it as a fun side project. I don't mind learning programming if I have to, to get it made. It' be fun~!
Hey! It's the end of the semester and boy was there a lot of work to accomplish.
Capstone pitches, RPP, and even a team environment project. Very busy times indeed.
Though now with the prior two far beyond us, now's to show off our assets for 2D/3D class environment for Starfish Island. Yay!
For me, I worked on those little guy's living spaces. Their huts, if you will.
Hut Concept Art.
They have very simple accommodations: a roof over their head, straw-like beds, and some decorations to make it feel so much more homey. Don't forget they live near the water's edge.
But enough of that chatter, let us snoop on some of their living spaces!
Hut Low Poly Model
Wood Plank Texture
Wood Plank Normals
Don't their homes look cozy? Though what is that by their door?
Skulls for decorations? Let us hope that the next guest does not become part of their menu.
Especially if they end up on a st
Like these poor guys.
Though the world as a whole looks epic. I shall post some more once it's completely done. c=
How it tortures me inside...All the innocent who suffer
From your stubbornness and pride!
It's that time again! Updates!
Drawing Fundamentals was flowing at full throttle! This all us awesome artists had to make a landscape that relates to our Capstone Rapid Prototype. Mine is The Scales of Truth. What does that mean? Egyptian themed landscapes!
Though where to start?
To figure that out, I made some thumbnails within a new technique I found out about. Never tried it before, and quite frankly, I love how it works. So much faster for me, than sitting there, staring at my canvas, trying to figure out what to draw.
Now what is this technique, you may ask?
Essentially, you make a canvas and divide it into equal sections then take photos from the net and mix them together. Basically, you make a digital collage. However, this chaos must serve a purpose. It must lead to a basic thumbnail design for your final cleanup that you will propose to the client.
Above, is the first step. A mangled mess where you see so many colors, though you can make out the gems that are needed.
Next, is to start painting over that mess to clean up some areas, make it more coherent, and figure out lighting. Obviously, there are some that I ended up liking a little too much and spent too much time making it into an actual piece.
Last, is to start adding details and making it a full thumbnail concept. Down with some texture feel, lighting and overall feeling of the room. My favorite was a tomb, of course, and it seems like it will be leading to something good.
I do know that I must practice on not taking so long on one piece. Though I did have a lot of fun doing this. This is essentially the style that I was thinking of when it comes to The Scales of Truth. Though, I do know this style takes much more time and probably would make it harder to achieve for a few month Capstone game.
Welcome warrior. It is time to show your worth and reap bragging rights here in the Colosseum.
If you wish to prove that you are the best warrior in the land, then slay these beasts and rank higher than your fellow warriors.
Be warned, these monsters will learn over time and become much more difficult to fight.
Colosseum in Maya.
Hey guys! Updating once again.
Things have been rather busy, and today I am posting some concepts (and hopefully soon a video) of the most recent Rapid Prototype Android Tablet game, Colosseum. Man that was a mouth full.
Anyway, in the Colosseum you play on an Android Tablet, or phone if you prefer, and you must slay a variety of monsters. Surviving for as long as you can to rank continue to increase your score. However, the rounds get harder over time and you only have two ways of attacking: Melee with your sword, or Ranged/Pierce with your arrow.
You also must be wary that you will be attacked at all sides. Yes, this game simulated Virtual Reality and you must rotate your phone all around you in order to see the monsters from all angles. Though, you can also restrict that turn on the opening screen by unselecting the 360 button which will move it to a standard 180 rotation.
Now, I probably made that sound confusing. Essentially this game is a virtual reality game and your phone/tablet is your "occulus rift" so to speak. You must look around the Colosseum to know where the monsters are attack and either tap (arrow) or swipe (sword) to attack the on coming monsters.
Bellow are just some of the monsters we had. These are the ones I designed and animated for the game.
Crisophynx. Flying opponent. Quick and hard to hit.
Ki-Rin. Speed Opponent. Low Damage but rapidly approaches player.
Manticore. Power Opponent. High Damage, slow movement.
This game was loads of fun to work on! First RPP also that I got to make enemies. Woot!
I enjoy drawing monsters and making them a real threat in a game, hence why I enjoy anything that is considered a bad guy in most forms of entertainment. lol
Next RPP prototype is Scales of Truth (Jasmine and my pitch for capstone). I'm really looking forward to this one, and so excited to work on this game. Hopefully Scales get's to move on to being a Capstone game
Hey guys! Still been pretty quiet when it comes to posting, but so very soon I shall be changing that~
Not that it is way past over, I shall be showing off the Pirate Fish Guy here for all to see. Yay.
First up:
The Low Poly Mesh.
Even though this project went for about a month of work for one character, and there was obviously some parts that was very annoying to work with, but all and all it was fun.
UV Mapping
Of course, not all of it was fun and games. Uv mapping for certain areas was pretty difficult. Strange enough ,it wasn't even the pieces others have told me would be the most difficult. The hand and head did not take long. But I had more trouble with the belt and buckles more than anything else. Things didn't go as smoothly all throughout as I would like, but it was a good experience regardless.
UV Mapping; clean.
UV Mapping. Test.
As fun as UVing was, my favorite part was actually the sculpting. Messing around with ZBrush to get that right texture was great. I got to bring the character alive and that was one of the best parts I got to work on. Though, I think I got a little too happy with making him closer to reality than making him a more cartoonish representation that was shown in the original concept art. But then again, he did say to go nuts and have fun, so to speak. So, I made him more towards what I like to do while also experimenting. Now that was fun.
ZBrush Turnaround Video.
I think he came out really nicely. It also didn't take me as long to do it as I thought it would. Which is surprising to say the least.
I think the one part that was the most annoying was the Bake Mapping. Originally, I mapped using Maya. Usually it works just fine, but for this guy, it never came out right. Black spots everywhere, details that was so strong on the sculpt never showed on the low poly mesh. It was annoying. Because of this, I had to find another way to do it. It was suggested to me to use the program xNormals in order to get a cleaner bake. Unfortunately that wasn't the case.
But then, Substance Painter came into the lineup. I was told that Substance Painter also does bake mapping and it is extremely accurate so long as the UVs are alright. Skeptical about it, I tried it anyway and was ecstatic with the result. The end result created a clean bake along with an ambient occlusion map (something I really dislike doing through Maya) to accurately obtain that look I wanted.
Normal Map. Ambient Occlusion Map.
It was neat! I loved the fact that it just smoothly transferred onto my low poly mesh and just looked like the high poly one without that strange blackness occurring. Because of that, I wondered why I wasn't using it earlier. It cuts down so much time, especially with painting. The choice of painting on the Sculpt or the UV's themselves? Madness! Though it works so well.
Substance Painter; 3D and UV painting mode.
Doesn't he look great? Next would be to show you all how he looks like in the world I created a while ago. Though, I think I shall wait to do that after I rig him for Common Core. Maybe that will go quite well, or well, hopefully that will go very well. Would love to see this guy waddle around with his short legs. 8D
Hey guys, long time no post. Things have been pretty busy here on FIEA, and for good reason. So much to learn and do with so little time, it's a wonder how things get done with how much sleep I like to get. xD
Jokes aside, this time around I am showing you wonderful people some horrible artsy coding in UE4!
Nothing all that nice really. Kinda Technical Artist type deal and what not. But I think I kinda understand it.
There's two different interactions that are going on, as shown on the video. The Bounding Box is one of the triggers where the player heads towards the opponent, in this case the starfish creature, for something to happen. In this case, the color changed into two contrasting spectrum: White and Black. I originally wanted to get the mesh to change many different colors when you go in and out of the box, but I couldn't figure out exactly how to do that. So I settled with the two different color, as shown.
The second trigger was a Key Trigger. Unable to get the other keys to read, I settled with pressing the G Key to make things happen. In this case, was getting the eyes to glow in and out, as what we did in class. Kinda wanted some other effects to happen, but the other keys would not trigger/read so I scrapped that idea and when simple.
Look how neat and pretty this is. xD
Though, of course, this is probably one of the more difficult assignments I had to mess with. When I get the chance, I shall record/screen capture my other assignments to showcase here. But for now, everyone can enjoy some music and quickly placed together render of the test file.
For now, I shall go and work on some more homework.. x-x
FIEA is moving forward rapidly and it seems that I'm not keeping up quite to the speed that I would like. For shame! It's seems that I will not be blasting through some of these assignments with Sonic Speed.
Lame pun is lame. I know.
But do not fret, dears, for I have at least one awesome assignment that I completed before the deadline this week. That would be the tile texturing for our weekly Common Core class! *throws confetti*
Now this assignment was fun. Got to play around in ZBrush and figure out exactly what kind of tile I wanted to make. Now, the only draw back I had was that ZBrush kept on doing this strange thing of disconnecting to the modeling I was carving into and making it into a canvas. I'm not sure what causes this, however I'm eager to find out what does. Perhaps if I can do that, I can prevent it from happening ever again. I would hate to constantly redo the same assignment 3-4 times so it can work (which is what happened with this assignment).
"Why me..."
However! With some patience I was able to make something awesome for all to see.
First off though, let's looks at the renders taken right out of ZBrush!
The Main Render. This is the overall design for a soon to be colored tile. Looks pretty cool as it stands now. It's not painted. I like to sculpt on the red material instead of the grey. Not sure why. I think the color just pops more for me.
The Depth Map. Shows, well, the depth of the scene. As good as that is, I think it may have ended up drowned out from the final piece.
The Normal Map. Looks neat like this as well. Honestly, I'm surprised that it looks so neat and clean.
Now for the coup de gras!
The Final Color Render. Final look of said assignment. I think I captured the heat and look of lava quite well. A first for me, actually. Always had trouble setting up the correct color pallet and design for lava. Who knew that doing the main concept in ZBrush would be the best course of action.
As a whole, there wasn't too many problems I encountered. I already expected there to be seams to fix when I imported these lovely files into Photoshop. It is rare, from what I've seen, to not have to fix seams for a tile texture.
Of course, that wasn't a problem to fix. Perhaps the only annoying problem was what was mentioned earlier in the post: ZBrush doing strange things and making me revert to a previous file. But then, that's what happens with technology. Things will eventually act strange, delete files, corrupt files, crash or just make things a pain to fix. Though all we have to do as artists is to make do with those issues and posh forward to make awesome digital pieces.
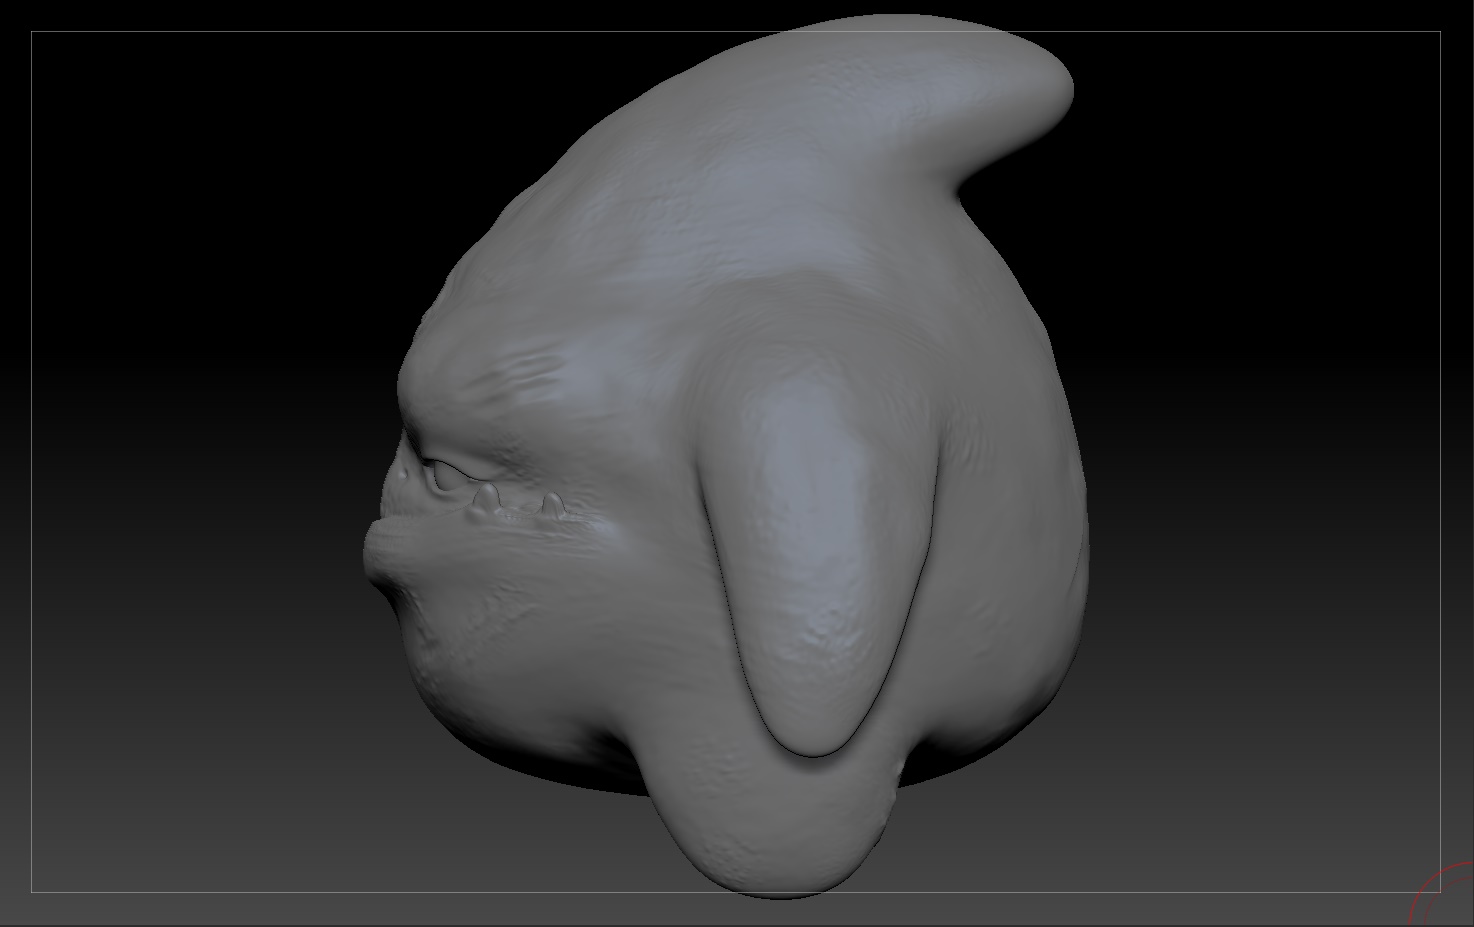
Hey, looks like another assignment done. Or at least sculpting part is.
This guy here has no official name, though, like the one that was modeled, I shall call him Bruce.
Bruce here is a decent aged creature that works along side a fish-like creature on the battlefield
.
I think he's working a little too much around those canons, don't you think?
Look at those scares on his face. Those burns (or at least it'll look more like burns once it's colored).
He looks pretty neat, right?
But this isn't his final design. Though not too different from this one, it gives the guy a bit more of a kick.
Now looking at it away from the program, it kinda seems like I should put something more towards his backside. It kinda looks a bit bland. But then, I shouldn't go overboard. He is a fleshy character after all.
Either way, I think he looks pretty good. I think, maybe, his teeth are my favorite part. I don't know, came out different than the concept art, but looks so good. xDD
Anyone else get the feeling this starfish is a little young? It must be those tiny teeth, he's probably adolescent at this stage.
I'm back and posting some new material! And no, it has nothing to do with the Little Mermaid. Instead, it's with one of her extremely deep sea friends.
In 2D/3D art, we were assigned to model, sculpt, texture and set one style of fish into the Unreal Engine. This was to be done in about a weeks time, which is a lot of if you think about it.
For my choice, I decided to go with a "bass" looking fish.
Low poly all around! I was actually pretty surprised I was able to do this relatively quickly. Only took me longer to get the Normal Maps to look clean. Which is cool, since I thought sculpting in ZBrush would have taken longer.
Especially with how it came out.
It has so much detail! I think I like the sculpting aspect a lot more than the modeling. Who would have thought?
Though that's not all! Next was color mapping, and I think I had a bit too much fun with that one.
I'm going for a fish that emits Bioluminescence in the deep ocean in order to attract either food or mates. Though usually they have blue, I enjoyed the idea of having one emit a pink-ish glow instead. That really came out when I placed it into the Unreal Engine.
I think the fish is a little big for a deep sea critter, though it looks really neat! I just love that light glow it has, and how there is a tint of blue light in the engine. I'm really hoping I got that good feel of the deep. Which is the first time of attempting it in any engine.
If anyone's curious, this is what I did for my fish to look alright in the engine. It looks great when I first put it in, it's even better now. xD